We have worked with some very talented calligraphers over the past several years and have had the pleasure of meeting some fresh new faces recently as well. It made me think about how many clients actually know about calligraphy and how beautiful and affective it can be to incorporate its cost into your overall paper products budget. Today we will review where you can use a calligrapher and the costs involved. Yes, you don't have to spend any money to have someone else write everything out for you but that can take hours and hours and your time is very valuable, so you might want to consider a calligrapher!
Calligraphy: n.
the art of writing beautifullyThere are a few ways to calligraph using different nibs- yes that's a technical term. Depending on the type of font, a calligrapher will use a different nib to create a thinner, more flourished font or a thicker, more chiseled font. Some fonts are so thin and delicate that an ink well can't be used and a calligrapher will use an actual pen to create the lines of the font.
Here are some examples of calligraphy in a more chiseled font:


The above two calligraphy samples provided by
Calligraphy by Jennifer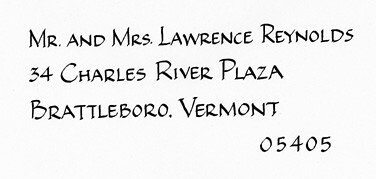
Here's an example of a thin font that Jan has created:
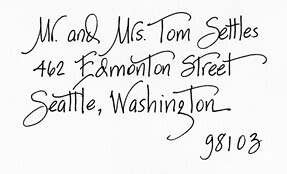
The above three calligraphy samples provided by
Jan Boyd CalligraphyThese simpler fonts would be great for a more casual wedding reception or maybe even a rehearsal dinner invitation.
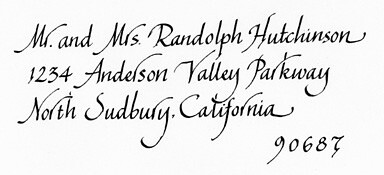
For a more traditional, formal font, take a look at these options:
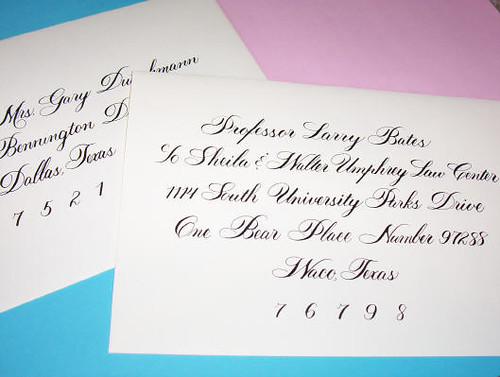

The above two calligraphy samples provided by
Calligraphy by Jennifer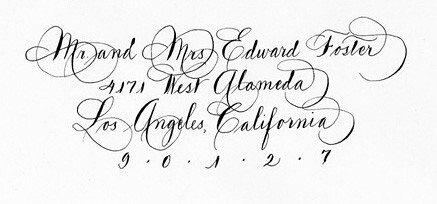

The above two calligraphy samples provided by
Jan Boyd Calligraphy
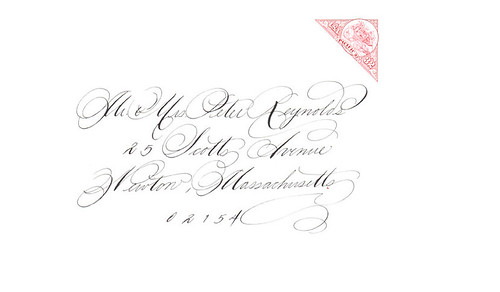
The above the calligraphy samples provided by
Ted Clausen CalligraphyYou can hire a calligrapher to take care of the following items:
Addressing Save the Dates
Addressing Invitations
Custom Invitations- they create one calligraphed invitation and send your printer a printable version
Place Cards
Escort Cards
Table Numbers
Addressing Thank You Cards
Specialty Signs- well wishes containers, signature drink menus
Custom Favor Tags
Custom Programs- they create one calligraphed program and send your printer a printable version
Custom Menus- they create one calligraphed menu and send your printer a printable version
Cost for each of these items greatly depends on each calligrapher, how many years experience they have, and usually the style of font you select. Here's a ballpark of what you might expect to pay for each of the above items:
Addressing Save the Dates-$1.25-$10.00 a piece for outer envelopes
Addressing Invitations- $1.25-$10.00 for the outer envelope, $3.00-$15.00 for outer and inner envelope sets
Custom Invitations- most calligraphers will charge a single flat fee of anywhere from $50-$150.00 for this artwork
Place Cards/Escort Cards- $.75-$1.95 depending on if the calligrapher includes just the guest name or adds the table number. Also if they have to calligraph an envelope and inner table number card that will be on the higher end of the price range.
Table Numbers- $5.00-$25.00 depending if the calligraph provides the paper and the level of detail of each table number
Addressing Thank You Cards- I HIGHLY recommend having this done for you so you don't have to deal with it after your wedding. The list is the same as your wedding acceptance list so send it to your calligrapher to not deal with the hassle! $1.25-$10.00 each envelope.
Specialty Signs- $5.00-$25.00 depending on the size of each sign and how many words need to be calligraphed
Custom Favor Tags- ask your calligrapher about this, their prices will vary
Custom Programs/Menus- similar to Custom invitation artwork, plan on anywhere from $50.00-$150.00
Now on to the timing of things..... you should schedule at least 2 if not 3 weeks for your calligrapher to get your invitations completed. They usually have specific ways they like to receive your lists, but excel or word documents are fairly popular and usually okay with most calligraphers. For place cards and escort cards most calligraphers can get those completed in 2 weeks. A rush fee can be applied to most orders to get them done in less time, and figure a 10-15% charge of your total bill in order to accommodate a shorter completion period.
Calligraphy is an added expense for sure, but it can be the finishing touch to all of your design elements- from your paper products, tabletop decor and even special extras. It saves you plenty of time too as it takes hours to write out everyone's addresses. Most of you who have attempted to write out 100 addresses know that after a while your handwriting doesn't look quite as good as it did when you started your project. Some people ask a family member or friend to address everything for them as well and although that would be very generous of that person, some people are very intimidated by such a task, worrying that it won't look perfect. So after all is said and done, consider working with a calligrapher to make your life easier and make your wedding design that much more special.
Here's a list of noteworthy calligraphers we either know or have worked with in the past and we HIGHLY reccomend:
Jan Boyd CalligraphyTed Clausen CalligraphyCalligraphy by JenniferLaura Hooper Calligraphy